Hope you have a day filled with treats and only nice tricks!
I'm planning to start blogging here again - I've missed all of you.
Monday, October 31, 2011
Friday, August 05, 2011
Children's Books Spared from Lead Law's Axe! Hooray!
This post also appears on my group writing blog, Route 19 Writers.![]() |
| Illustration by Arthur Rackham for Wagner, Richard (translated by Margaret Amour) (1911). Siegfried and the Twilight of the Gods. London: William Heinemann, New York: Doubleday. Public domain image obtained through Wikimedia Commons via Haukurth |
They sometimes emerge from these battles a bit singed or bloodied, but emerge they do.
Then a few years ago, another threat quietly crept into the children's book world and threatened catastrophe, especially for libraries and fans of vintage books. In 2008, in the wake of recalls of popular toys (made in China) for high lead levels, Congress nearly unanimously passed a law intended to protect children: the Consumer Product Safety Improvement Act (CPSIA). This law, among other things, required that ALL children's products aimed at kids 12 and under be tested and certified to be (basically) lead-free. Lead is a known neurotoxin and children are especially vulnerable.
Sounds like a good idea, right? Well, the devil is in the details, and unfortunately the law failed (among other flaws) to exempt zillions of products that pose no significant threat to children. Like books. Which have NEVER been implicated in a single case of lead poisoning.
Not only did the law require expensive testing of each of the components of new books (which would have driven up the cost with no increased benefit to kids), it was retroactive, requiring testing and certification of previously published books. Here's why this was terrible for libraries and used books:
- Testing is terrifically expensive (and hard to obtain) and libraries and used sellers were required to test every children's book in their collections or for sale.
- The mandated testing is destructive testing - which means after submitting a book for testing, the library or bookstore would no longer have the book to circulate or sell.
Fearing lawsuits, some libraries and many used sellers did remove older books from their shelves. But the reason your local library may not have a nearly empty children's department is that the CPSC has issued a variety of stays of enforcement and temporary exemptions (plus there are bunch of feisty and renegade librarians out there) - but all these stays and exemptions were set to expire at the end of this year. And every attempt to amend the law or repeal it has failed.
Until this week!
Here's the start of the announcement of the amended law in Publisher's Weekly (written by Karen Raugust who has done a terrific job of covering CPSIA book developments for PW):
On Monday, three years after the August 2008 enactment of the Consumer Product Safety Improvement Act, publishers of ink-on-paper books and other printed materials suddenly received news they’d been hoping for from the outset. Both the House and Senate passed an amendment to CPSIA that exempts “ordinary” children’s books, along with a few other classes of products (e.g., all-terrain vehicles and motorcycles), from the law’s testing provisions.
It also removes the retroactive provisions of the original law, so old books are officially safe again!!! You can read the rest of the good news here.
Children's books win again!
Sadly, for people who care about kids, the battle to make CPSIA reasonable and effective is far from over. Many, many safe and valuable products were given no relief, including original wall art for kids, small batch handmade toys and apparel (made with all safe components), limited batch items aimed at kids with special needs, and many, many more. Get in touch with your congress-folk and let them know you want further changes! You can read more about how the law affects other products here on the blog of a producer of quality educational products for kids; warning: Rick Woldenburg who writes the blog is angry. Understandably.
I'll leave you with images of a lovely vintage book now spared from the toxic waste dump: Ameliaranne Keeps Shop, "Told in Words by Constance Heward; Told in Pictures by Susan Beatrice Pearse" as it says on the title page. My copy was published in 1928 by David McKay Company, and the story about the kind and resourceful Ameliaranne is as charming and fun to read now as I expect it was nearly a century ago.
Isn't it gorgeous? And though a few of the Ameliaranne stories are available as downloads, what a shame it would be to miss the visceral experience of holding this beautiful small book! And smelling it - it has a wonderful scent of bookcloth, glossy paper, and time. And love.
Because who could not love Ameliaranne? In this tale, she has to think on her feet and figure out how to thwart a nepharious imposter trying to make off with the shopkeeper's money.
Fortunately she is as clever as she is good-hearted.
It all works out! For Ameliaranne, the shopkeeper, and Ameliaranne's young siblings who want to go the picnic but need new shoes which their washerwoman mama can't afford.
Even the endpapers are breathtaking.
It is exceedingly hard to track down information about the authors and illustrator of these books, but you can read a little more about the series of Ameliaranne books on Jane Moxey's lovely blog Moxey's Musings here and find a list of all the Ameliaranne titles (which were written by a variety of authors but always illustrated by Susan Beatrice Pearse) on a Fairacre Wikia page here.
I'm jumping for joy!
Monday, February 14, 2011
Happy Valentine's Day!
When I was a kid, my favorite part of Valentine's Day was not candy, getting tons of mail, or finding out that someone I liked liked me back (though of course I loved all those things), but making my Valentines. I spent weeks before the big day dreaming up different designs and then troubleshooting construction problems (my Valentines always had some complicated paper engineering thing going on, with windows or doors that locked with a lollipop stick, folded paper springs that made hearts pop out when someone opened the card, or other pop-up features). And then there was the making phase, parked at the kitchen table with my mom and sisters and piles of construction paper, doilies, and gobs of old-fashioned paste. I have conveniently forgotten the temper tantrums that traditionally accompanied my over-reaching projects.
The happy memories are no doubt the reason I often spent every February 13th when my kids were young once more parked at the kitchen table with mounds of craft supplies trying to coax my craft-indifferent sons to make their own Valentines too (and then staying up late finishing them up when the boys abandoned the project midcourse and I couldn't bear to think about some poor classmate being left out).
Fortunately for me, my daughter was a different story. She liked to make things too. And still does to my everlasting delight.
The little matchbox Valentines she made in first grade remain one of my all time favorite Valentine projects. (The little love bugs inside were NOT my favorite - too fiddly for little hands.) These Valentines were also a favorite of my middle son's, because not only did he do something similar, albeit simpler:
I let him keep the giant ziplock bag full of the matches we dumped out of the sixty-some little matchboxes! Which was a LOT of matches.
He spent the next zillion summers constructing elaborate if rather wobbly structures from the matches and glue and then setting them alight (under adult supervision, in the driveway, on low wind days with a bucket of water handy, but still). I am a terrible mother obviously.
These are very simple Valentines to make, possible to do at the last minute if you have a spare box of matches handy. Simply cut a paper strip long enough to wrap around the box, draw a design on the front (my daughter designed four different buildings - the flower shop and house shown at the top of this post, and I think a school and a library, but I guess I didn't save samples of them), and then glue it in place. For mass production purposes, I pasted up the four designs on a single piece of paper and photocopied them, and then my daughter cut out the strips and glued them around the boxes -- but one of kind designs work too.
I recommend putting some heart stickers, a sweet note or a little candy inside (as my son did) rather than spending a bazillion hours gluing miniature googly eyes and punched heart "wings" onto glass gems. Fewer frustration tantrums for everyone that way.
I'll close with a photo of my pug, Koko, who is celebrating her 11th birthday today. In style.
Tuesday, December 21, 2010
Cut Paper Christmas: Encore with a Solstice Slant
My goodness, there has been a lot of Christmas-time paper cutting at my house over the years! Here are some more paper cuts that we've done in years past - some by my kids, some by me - mostly with a snow/winter theme. I'll add some tips for making your own.
The snowmen above were part of a large quantity of paper bag papercuts we made one year to adorn our packages, which were wrapped with either plain white or plain red paper. One of my kids did the cutting for the one above, following a free hand drawing I did on the back side of the paper. It was cut on a fold (sort of paper doll chain style, only with just a single repeat). I reused the lightweight paper bags the kids took their lunches in - they have enough body/stiffness to cut cleanly, but are light enough for small hands to get the scissors through two layers easily. The eyes and buttons were made with a standard circle hole punch. I let all my kids graduate to real scissors (often Fiskars embroidery scissors) at a relatively young age (6 or 7) and just supervised their cutting. No one ever got hurt, not even a smidge, though my guys did not have especially good fine motor skills. (I think kids are sometimes more careful when they're using real tools - and the results are definitely superior.)
The house above is basically the same method, but a single picture with no fold/repeat. Also cut by a child (though I may have cut the windows - don't recall). For interior cuts (like the windows and door), I usually (re)folded the paper so the kids didn't have to poke scissors into the middle of the paper to get the window or whatever started. Afterwards, I ironed the paper cuts on a low setting to get out the folds. (You can even mist kraft paper lightly to steam it and make it smoother.)
What I like about it is that the polar bear is a negative - I cut away part of the blue paper to leave the figure. The moon and stars are also negatives. It's somewhat trickier thinking the drawing through - and also harder to cut (you have to be careful not to cut away the lines of the legs and make an effort to keep the lines thin enough), but going slowly and holding the thin unconnected bits with a fingernail to stabilize them as you cut are the keys. I start first with the small interior cuts, like the space between his hind feet and the rearward front leg - it's easier to do those while the paper is still mostly whole. Then I cut the edges of the lines for the legs before cutting away the rest of the interior bear. Last I cut away for the snow and forming the outer edges of the polar bear's legs.
The shadow is a piece of gray paper added separately - though obviously I didn't think through the direction the moonlight would cast it!
This was also our Christmas card one year - made by my oldest when he was in kindergarten. We planned the picture together - and what was notable was his idea not to show the whole person, just part. That's an unusual approach for a child that age - but it shows the value of sharing good art and talking about it with your children. Just before we made this, we visited the Carnegie Museum of Art here in Pittsburgh. I have forgotten which painting served as his inspiration, but I clearly remember our discussion about cropping images and choosing what to show and what to leave out.
He cut the snowflake freehand (I folded the paper for him first). Making snowflakes was a constant winter activity for my kids in those days. Then he cut out the shapes for the mitten, sleeve, face and hats from white paper following lines I helped him draw on white printer paper. He also cut fringes from black construction paper for the hair and shirt cuff and we glued everything onto another piece of black paper. I cut the curves for the eyes and nose, and he made circles for the pupils with a paper punch. To make the cards and gift tags, I photocopied the image, reducing it to a variety of sizes and ganging them onto a single sheet so I could print a bunch at a time. This was pre-photoshop years! We cut and pasted the images manually onto white cards or manilla tags. They looked pretty sophisticated for a five-year-old's work.

The images above and below were cut by me from silhouette paper, using a craft knife. They look challenging (and were, because the originals were fairly small - but carefully planning and working slowly are again the keys to success.
Real silhouette paper is nice to work with - a good weight and reasonably strong. You can buy it here. For these kinds of images, I draw the image on vellum tracing paper with a soft drawing pencil (like an Ebony pencil - love those guys) because they make nice thick lines that are easy to leave behind as I cut. It's best to use a slightly dull pencil. I then turn the drawing upside down onto the back (white side) of the silhouette paper and transfer the image with a wooden stylus. This means the final image will have reversed back to the same as your drawing. Be careful not to press too hard or the lines will show through on the final silhouette.
I like how the pinecone and some of the needles "violate" the borders in these. I always like that in book illustrations too. The illustrator Tomi Ungerer often had elements in his pictures violating the borders.
You can often reattach bits you've accidentally cut away by taking a thin scrap and gluing it to the back side of the main piece and the cut away part. Touching up with a little permanent black ink will hide any telltale white lines.
Below is a Santa cut by my son when he was nine or ten. I did the drawing, and he did the cutting using embroidery scissors and silhouette paper. I cut the black frame for him with a craft knife - it gives the work a nice finished appearance, I think.
My son wanted to make a Santa holding a star like the one in this charming, quirky vintage Christmas book first published in 1956. It's by Mary Chalmers, one of my all time favorite writer-illustrators.
Unfortunately, the original, which was lovely and just the right size for small hands, belonged to that same younger sister, and I wasn't able to steal it away once we were grown. For years I tried in vain to track down a copy of my own - luckily it was reprinted a while back, though in a larger, glossier format I just don't like nearly as much.
Sigh. Books like this that were scarce before CPSIA have only become rarer still. But if you want an old copy, you can hunt for one on sites like Amazon, Alibris and AbeBooks.
I'll leave you with one last snowflake blizzard - arranged into a wreath one year to fill the space above my mantle until I could come up with some art to put there. (We'd just taken down the damaged mirror that was there before and repaired the wall.) I think I got the idea from a magazine. (Martha Stewart?)
Friday, December 10, 2010
Sydney Taylor and the All-of-a-Kind Family Books
| First book in the series of five, first published by Delacourt in 1951 |
When I was a young child during the early 1960s, I knew little about the Jewish faith or holidays - even though I now realize one of my best friends was probably Jewish (her mother was a Holocaust survivor). My family, though not religious, celebrated the standard Christian holidays, and at school, we only discussed and celebrated these Christian holidays or the official American ones like Thanksgiving and Memorial Day. The local stores and my community then (Arlington, VA) only decorated for them too, and so if there were Jewish kids in my midst, it just didn't come up. In short, there was little to expand my cultural knowledge - except books, which I was lucky enough to have in abundance.
| The Stair-step Sisters checking out library books in an illustration by Helen John |
![]() |
| Second book in the series |
My sisters and I loved the whole series of five books, but I think our group favorite was the first one. I do know that after we moved to Ohio when we were on the cusp of adolescence, our tattered copy lived in the crammed-full bookcase in the third floor bathroom. That bathroom boasted a deep claw-footed tub where we took turns soaking away our teen angst while reading voraciously. Over time, that collection of much re-read childhood favorites became known in our family as "The Bathtub Books," and we squabbled again as we grew up and left home over who could lay claim to which ones. Which was silly, since they were all utterly waterlogged, stained, and tattered to the point of falling apart. (You can read more about them and other ideas for encouraging a love of books in your kids in an earlier post here.)
| Third book in the series |
| Fourth book in the series |
Her illustrations added enormously not only to my enjoyment of the books, they really brought the time and place to life for me, by providing information not necessarily clear in the text. Looking these over again made me sad that relatively few middle grade novels today include any illustrations - kids don't outgrow their pleasure and profit from pictures when they begin to read alone.
| Illustration by Helen John from chapter "Rainy Day Surprise" in All-of-a-Kind Family |
With the volumes of Dickens, the book of fairy tales, and The Dolls That You Love parceled out among them, they trooped back to the front of the shop to show Papa their finds.
"May we keep them all?" Ella asked.
When he said "Yes," they could hardly believe their ears. They never thought to own even one book and now they had twelve. It was too wonderful!
![]() |
| Fifth and final book in the series |
Most of my family's copies of these books arrived wrapped in white tissue paper and tied with white ribbon in the giant boxes of Christmas gifts my grandmother sent to our family from her home across the continent in California. Most of the gifts were books obtained from the bookstore where she was a clerk and squirreled away all year until the holidays in a large sandalwood chest she owned. To this day, the sight of red ribbon against white paper or the scent of sandalwood sets my heart beating with anticipation.
Now for the sad part: as I mentioned in the first paragraph, most of these books are no longer in print, and even the old editions are hard to find. What's worse, many have not been in print for years. Most of my copies are pre-1984, the year of doom under CPSIA. Yes, the Consumer Product Safety Improvement Act continues to prohibit all children's books printed before 1984 for use by children, regardless of how miniscule the risk they might pose (see the links in the sidebar for more information about the law and the safety of books). Many libraries have already removed all these older copies from their shelves (and discarded or destroyed them); many used booksellers won't carry them for fear of incurring gigantic fines and criminal penalties; and they are getting harder and harder to find at prices families can afford. I thank God every weekend that the yard sale people still don't seem to have heard of the law.
I have hope that with a new chairman of the commerce committee (Henry Waxman, former chair, will be replaced when Congress reconvenes) that Congress will finally relent and revise the law (or at least hold hearings on it) - but meanwhile, these precious books continue to fade away. It would be a crime if they were lost altogether. After the holidays, please write again to your senators and congressional representative. (By the way, the stay of enforcement for testing of new, harmless books expires in February - so expect prices of kids' books to rise still further and choice to drop still more if nothing happens legislatively. See this Publisher's Weekly article here.) And maybe we can all persuade Delacourt to re-print them again...
Hope springs eternal in this season.
To end on a more upbeat note, it's clear that many adults still have strong and happy memories of these books. Check out the Amazon reviews about the books, and Anita Silvey's wonderful book-a-day blog post on the books here. You can also read a detailed tribute to Sydney Taylor, who lived a fascinating life (including a stint as a Martha Graham dancer), at the Association of Jewish Libraries here. Finally, much of what I learned about Sydney Taylor, I gleaned from her thorough biography in Children's Books and Their Creators: An Invitation to the Feast of Twentieth-Century Children's Literature (Houghton Mifflin, 1995), edited by the always fabulous Anita Silvey! (If you love kids' books, it's a great reference book to add to your wish list.)
Friday, December 03, 2010
St. Nicholas Day Paper Boots: For When a Paper Shoe Simply Isn't Big Enough
| Not-big-enough paper shoe - Needs more room for chocolate |
My tutorial for making paper shoes for St. Nicholas Day is probably my most popular post ever, which kind of cracks me up, since I hadn't imagined there would be much demand for such a goofy thing as a paper shoe. It's so popular that this cool online magazine, InCulture, asked me if they could reprint it this month as part of their holiday issue. You can find it here - and check out the rest of the magazine while you're at it. Lots of interesting articles on multicultural issues for kids and parents.
Anyway, I've recently learned there is an even greater need out there: a tutorial and template for a paper boot! Because boots are also traditional to put out for St. Nicholas Day and well-worn ones tend to smell even worse than used sneakers do, if that's possible. More importantly, a paper boot can hold WAY more chocolates and other goodies than a paper shoe can. That's a need I can appreciate.
I didn't really have any idea how to make a paper boot, though, so I turned to my smartest, most trusted friend: Ms. Google.
And she let me down. The only templates/examples I could find for paper boots were really lame. In particular, they failed on the most important characteristic of a paper boot: capacity. This is because they were basically boot-shaped envelopes.
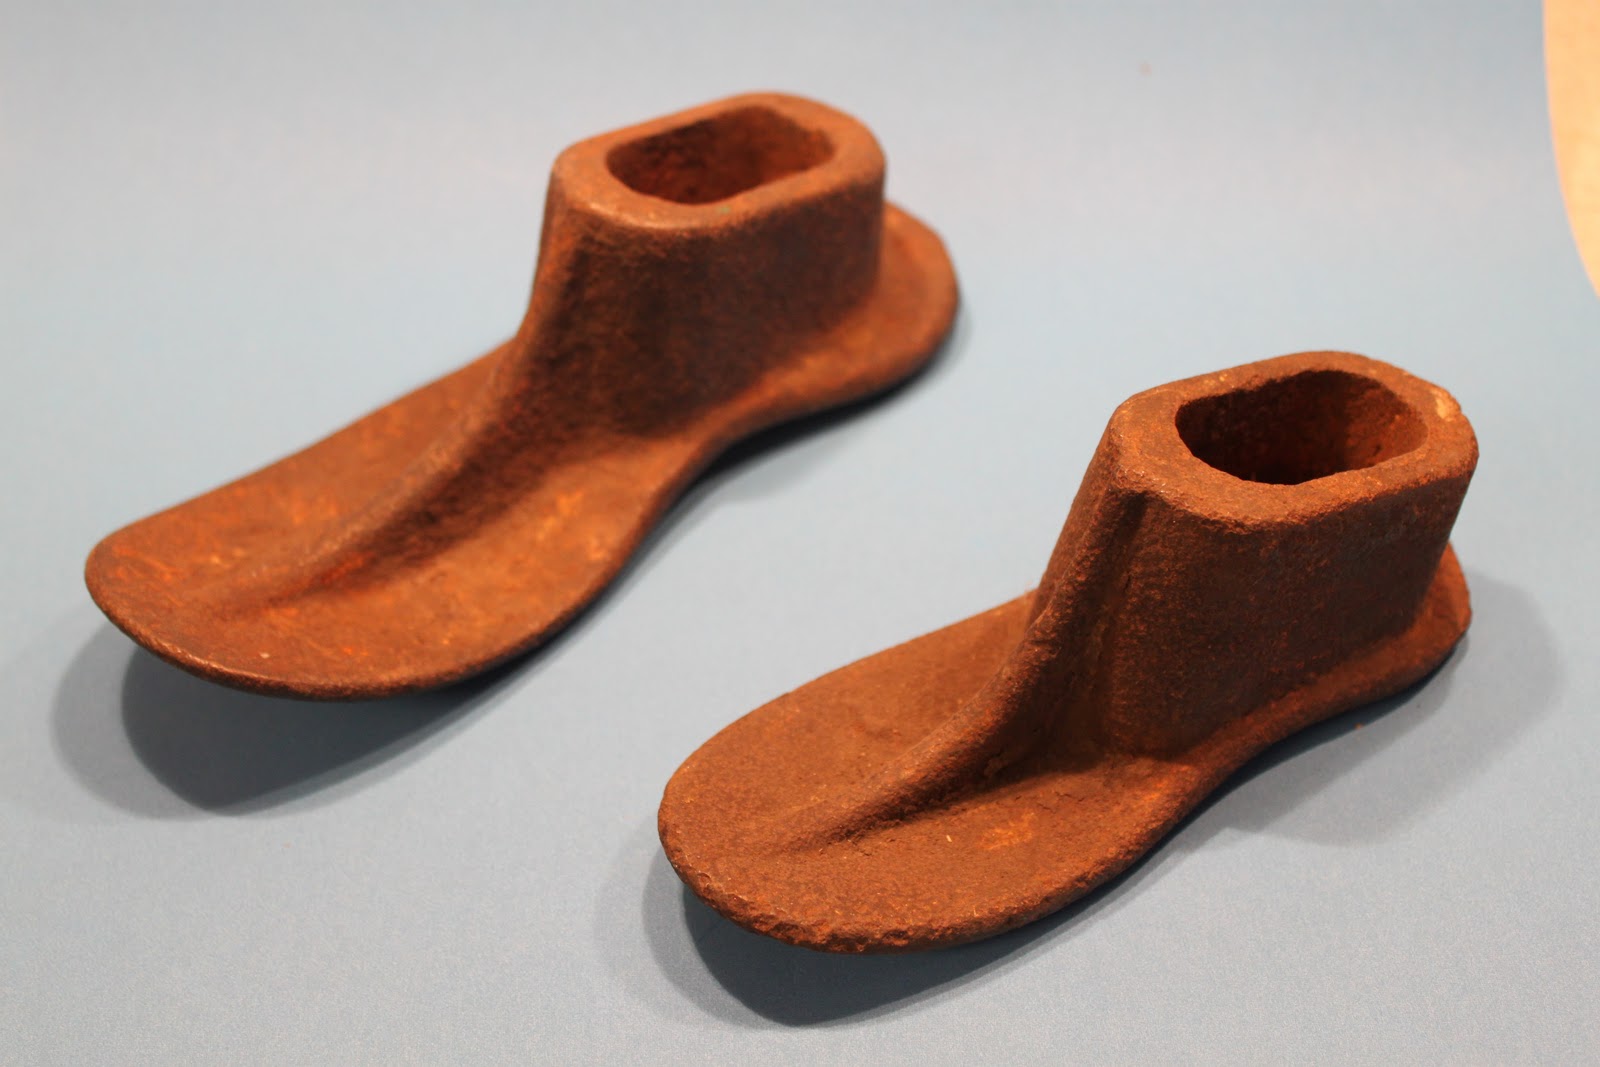
I have limited footwear engineering skills. Really, that paper shoe pretty much exhausted them. Though I do have these really, really cool vintage-maybe-antique children's shoe "lasts." (See, I even know the technical lingo.) They're iron and really, really heavy.
So I was kind of stumped. Then I tripped over someone's boots in the hallway (oops - they were mine. It SNOWED yesterday. The nerve.) And then I had a flash of inspiration for how I could adapt the basic St. Nick paper shoe into a paper boot. And it only took me two tries to make something that works.
You'll Need
- Scrap papers
- Cardboard from a cereal box (for making the original shoe, if you haven't already)
- Printed templates (see below)
- A pen or pencil
- A pair of scissors
- A glue stick (preferably the strong craft kind) or white glue with a toothpick or something to apply it.
- A handful of unused tissues
- A smidge of patience and frustration tolerance
1.Make the paper shoe from the template and tutorial here.
2. Print out this new template for the boot's upper, and transfer it to a paper of your choice.
I used the test print sheet my stupid printer wastes ink on every time I install a new cartridge. Cut out the two pieces. (Mine has nice decorative edging because I accidentally got Sharpie all over it when I was tracing it to make the printable template. I'm pretending it's a design feature.)
3. Stuff the shoe with the unused tissues. (You can reuse them later, so just sniffle for a bit until this is done.)
Stuff them loosely. You're going to need to extract them from the finished boot later.
4. Slather some glue stick on the piece that attaches to the heel and stick it on. Be patient. Wait for the glue to dry.
5. Now glue the sort of pointy part of the other piece of upper onto the top of the shoe. (There are probably fancy technical names for these parts, like "flange" or "gasket" or "whippersnapper," but I don't know them.) BE PATIENT. It will be much easier to do the next, a-little-bit-fiddly step if you let the glue dry.
6. Pressing hard, run the glue stick along the edges where the boot part will attach to the rest of the shoe upper and turn the corner to run glue along the part that will stick to the piece you already attached to the heel of the shoe.
Then stand the shoe up and stick everything together.
This is easier said than done. In truth, it is a bit fiddly. It might not be perfect. I have a little gappy place in mine. That's okay. This is a paper boot, people, not a pair of ridiculously expensive Frye boots like my daughter wants for Christmas. Just pretend you're one of the little elf guys in this story.
Only with less hammering. You won't have much boot left if you break out the hammers.
Do one side at a time, because otherwise the glue on the other side will dry out before you finish attaching the first side.
Here's a closeup of the attached bits.
7. After the glue dries, pull out the tissues, wipe everyone's noses, and dispose of them properly. Not in recycling, even though they're paper. Too gross.
There! Not bad for a paper boot, is it? And it totally beats those envelope ones in the important capacity category. You can have a rush of enthusiasm and decorate it if you want - glue some ribbon or rickrack around the top, attach some real or paper buttons or silk flowers or something. Be creative - I bet you can come up with some very
Just don't forget to put it out for St. Nick on the night of December 5th. Because it really looks best all filled up with chocolate and other lovely goodies.
Wednesday, December 01, 2010
Happy Hanukkah! With Coloring Tutorial!
This is a paper doll based on the star of my book Mimi, which I first posted last year in a longer piece about the holiday (complete with book recommendations and latke recipe) here. I've colored the sheet with colored pencils (though unfortunately it hasn't photographed great and scanned even worse...) Anyway, as a gift for the first day of Hanukkah, I'm going to offer some tips on coloring for young artists.
Below is the uncolored page, which you can dowload and print as a pdf here.
By the way, I apologize if you tried to download this or any of my other free printables recently and got asked to pay a monthly subscription fee to Scribd first. Apparently they were trying an "experiment" by asking people to subscribe in order to use "archived" documents (which they defined as anything that had been on there more than a couple months). They didn't notify users, so I didn't realize. But I've now changed my settings and you should once again be able to download all my printables for free. Sorry!
Tip Number One: Use the Best Quality Supplies You Can
One thing many people don't realize is that the kind of colored pencils marketed for kids are, well, lousy. If you are lucky, you'll get even a small set of artist-quality colored pencils, like these ones made by Prismacolor for Hanukkah or Christmas or whatever holiday you celebrate.
As you can see, good supplies are much more expensive than the kid-quality ones - the smallest set of 12 pencils is $10 US at 50% off at the above retailer - but they are totally worth it for several reasons. First, they work better which enables kids to produce a better final product which encourages them in turn to work harder and longer at their artwork. Second, kids are more likely to take care of and keep track of something that is special and valuable; this teaches them respect for their tools and good lifelong habits. And finally, giving them "real" art suppplies lets you demonstrate that you take your kids and their interests seriously. Two of the best gifts I ever received in my life were a set of artist quality watercolors that I got when I was nine (and which I still have and use) and a drawing table my folks got me for my birthday when I turned eleven. I still have it too, but my daughter uses it now.
One caveat: artist quality supplies don't have to adhere to the same safety standards as kid materials. Make sure you choose appropriate materials for kids who still mouth things or lack the dexterity to handle tools which are sharp or otherwise dangerous. And remember the real stuff is more likely to stain...
Tip Number Two: Start Light and Work Darker
You can always make things darker, but going light again is less successful. If you start out light, you'll be able to add some darker areas around edges or in folds to give a sense of dimension. In the image below, see how I've colored Mimi lightly all over, then gone back and added darker areas (fading toward light) around the edges of her face and in her ears to give the sense of roundness and/or depth. (I've also used a slightly darker pencil for her nose, mouth and eyebrows, but you can get almost the same effect by using more pressure on the pencil.) Another note: the pink pencil I used wasn't Prismacolor but highish quality kid pencil - and see how much less waxy and smooth the coverage is than with the yellow.
Another tip is to use dull pencils (or crayons) for large uniform areas of color and sharp ones for picking out details. And an advanced technique (which I did not use here) is to go over your colored pencils with a white one - it creates a smoother texture. That's called burnishing.
One other thing: many art educators frown on coloring; they feel it stifles creativity and doesn't teach kids real art skills. While I agree that coloring alone is not art, I disagree about its value. It lets kids (and adults) experiment and practice with basic skills and color use in a very low risk way. Similarly, using tracing paper, stencils and other "cheating" ways of drawing can help kids develop an understanding of how to draw things and muscle memory that lets them work more quickly on similar things in the future.
Tip Number Three: Shade with Other Colors
You'll get even better effects using blues, grays, and browns to add more shadows. To decide where to put shadows, look at things around you. In general, shadows go in areas that are under, behind, etc. depending on the light source. Learning to look carefully is a core skill for artists and worth cultivating daily.
Tip Number Four: Play with Color - and Leave some Areas White
I made Mimi's new dress a pale blue, in part because blue is a traditional Hanukkah color, but mostly because I like how the blue looks against her pink skin - a nice cool (blue) color contrasting with a warm (pink) one. With her underclothes, I went with yellow as an experiment to see which pairing I prefer (I like both, but prefer the blue a bit.) I used my light-dark technique to make the detailing on her dress look different from the main fabric too. And I chose green and yellow for the dreidel and gelt bag because I like the contrast with her dress. (Plus I made the menorah colorful, because I like the joyfulness the color scheme suggests - colors are strongly linked with emotions.)
You can play around with creating different shades by layering different colors on top of each other. I didn't here, but it is a fun and often overlooked technique.
Another thing I did was leave some areas white - we forget that the absence of color makes a statement too. So the bib of Mimi's dress is white instead of light blue (looks subtle in the picture), and her tights are lightly striped blue and white. I've also use white for modeling/texture. For example, by leaving areas of white on the toes of Mimi's party shoes, they appear both rounded and shiny.
Tip Number Five: Add Details, Make Changes, Make It Your Own!
You don't have to be limited by what is in front of you. I added an "embroidered" snowflake to Mimi's dress and yellow and orange stripes to her undies. I could have done more things - made Mimi a brown pig or even a green one. That's the beauty of coloring and drawing - you can make anything you choose!I've always loved this description of one of the "Useless Presents" the poet Dylan Thomas recalls in his now classic book, A Child's Christmas in Wales by (I know - wrong holiday):
"...and a painting book in which I could make the grass, the trees, the sea and the animals any color I pleased, and still the dazzling sky-blue sheep are grazing in the red field under the rainbow-billed and pea-green birds."
And that's it! If you want more advanced tips on drawing with colored pencils, you can also check out this tutorial.
Here's Mimi assembled but uncolored :(.
By the way, I LOVE paper engineering. It was lots of fun for me to figure out how to make a menorah that "works." By that I don't mean light the candles on fire. You can insert the proper number in for each day. Maybe you could craft another cool thing for Mimi yourself, like a little box of colored pencils where the pencils really go in and out. Or a dreidel that really works. This site is a cool if nearly overwhelming place to get some ideas and references.
Subscribe to:
Posts (Atom)