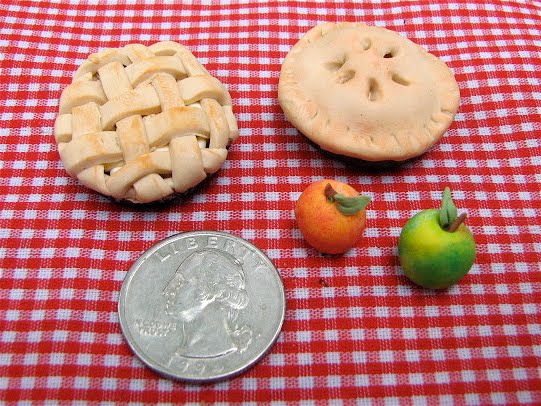
 Well, I still haven't managed to resurrect my old hard drive. But I've decide to celebrate having a new computer up and running by recreating the mini apple pie tutorial I mentioned in an earlier post here. This tutorial is more or less the process I used to make the apple pies in my newest picture book An Apple Pie for Dinner (by Susan VanHecke, Marshall Cavendish, 2009). I learned the basic strategy for making the pies, the apples, and many of the other clay miniatures for the book from Sue Heaser's outstanding book Making Doll's House Miniatures with Polymer Clay.
  You can read about Sue at her website here and also find ordering information for the book - which I really cannot recommend highly enough if you're into making polymer clay tiny things.
Anyway, here's the tut (I'll do the apples, and maybe some pumpkins or something too, tomorrow. I hope.):
 STEP 1: Gather your materials (most of which are shown above)
- Clay I used Fimo "sandstone" for the crust and a mix of yellow and white for the apples (but you could certainly cheat on them since they barely show). Any brand of polymer clay will work. If you're making this with a very young child, you might want to consider using a more kid-friendly modeling material like Crayola's Model Magic, plasticine, or even play dough. For that matter, you could use snippets of real dough and apple bits (though I'd recommend either not eating the finished product or removing the plastic liner from the bottle cap first).
- Bottle Cap This will be the pie pan. You can buy unused ones at craft stores or some kitchen/beer-making supply places and they're really ideal since they flare out a little more. But I just used one from a bottle of root beer, and it was fine. If you're making this with a young child, consider using some larger "pan" like a bigger metal lid or dessert patty pan - this scale is challenging for little fingers.
- Soft Pastels OR Ground Cinnamon You'll use these to "brown" your pie to a lovely golden color. You also need a tool to scrape some of the pastel dust off and a paint brush to spread the coloring, whichever you use. I used real cinnamon, which works just as well and has the added advantage of smelling lovely.
- A Cutting Tool I love the super thin slicing tool pictured above, but an x-acto blade or old paring knife (NOT one you'll want to use again for food) or other sharp blade will do. Obviously an adult should use the sharp tool!
- Waxed Paper Or something similar to protect your work surface. Do not use polymer clay directly on wood or on any surface used for food preparation or consumption.
- A Baking Container Many polymer clay artists prefer glass pans, but I find cookie sheets, metal or ceramic baking dishes or cheap aluminum bakeware works fine. You can even just bake the little pies inside a cupcake liner place carefully on the rack. Just don't use a container you'll want to bake food in again.
- A Small Wad of Fiberfill (optional) For filler in the bottom of your pie and a few strands for "steam."
- Miscellaneous A soft brush (even a soft OLD toothbrush will do), a pointy thing like a bamboo skewer or knitting needle if you want to make a traditional top crust (I'm going to show a lattice-top crust). If you want to add steam, you'll also need a couple drops of a glue that adheres to clay. And if you want a sliced pie, some gloss medium or varnish will give it a more realistic look.
 STEP 2 Prepare the crust
Cover your work surface with waxed paper. Then condition the clay you're using for the crust by kneading it with your fingers or running it through a craft pasta machine. You'll need two balls about the size shown (I stuck the penny and bottle cap in to help you judge the amount.)
 STEP 3: Roll out the dough into circles
I didn't actually roll these out - just flattened them with my fingers. With a pasta machine, use the #4 setting. The kids I've done this project with really liked using miniature rolling pins, but then we had to go back and fine tune with fingers. Ideally, the crusts should be very thin (especially the one for the top crust).

STEP 4: Put the crust in the pan
I used the rounded end of my old toothbrush to help work the crust tightly against the sides of the "pan." Any rounded object will work.

STEP 5: Trim the excess dough
Not really a precision maneuver at this point. It does help to leave a little dough overlapping the top crust, especially if you're going to make a full top crust. This is easier with the flared unused bottle caps, but you can fudge with either.

STEP 6: Prepare the filling
I like to put a small wad of fiber fill in the bottom of my pie as filler - but you could also make a zillion more mini apples or use little lumps of clay. If you want to make the finished pie look like it has a slice taken out of it, make sure you cut away a slice of bottom crust and leave just a couple crumbs and a couple apple bits in the bottom. Save the cut out bottom crust to make a slice that will stand on its own.
(By the way, I had too much fiberfill in the picture above and took some out before filling it with my apples.)
Prepare the clay for the apples by conditioning a small ball of white and a pinch of yellow and kneading them together until they're a pale yellow. You can add a smidge of green too, especially if they're supposed to be Granny Smith apples.
 Form this clay into small apple crescents. They won't really show much if your pie is completely covered, but they look good peeking through and give the top crust a natural lumpy look.
STEP 7: Dump the filling in the pan
Really, carefully arrange your mini apples over the fiberfill or clay lumps. Remember the nearly "empty" area if the pie will be missing a slice, and put some apples in the cut out slice you set aside.
At this point, you can sprinkle/brush a little cinnamon or cinnamon-colored pastel over the prepared apples - more important for a sliced pie than a covered one. (Don't forget to add some to your separate slice too.)

STEP 8 Prepare the top crust (Sorry for the lousy photo here.)
Retrieve the other crust circle. If you'll be making a lattice top like I am, cut it into narrow slices. I wanted at least 10 strips, so I could have 5 in each direction.
If you'll be making a full top crust, use your skewer or knitting needle to poke some holes in the top (where the steam would escape). You can also use clay scraps to make little leaves or a tiny apple for a decoration for the top. Finally, if you want a sliced pie, cut out a wedge shape out of the top crust now - it's trickier to slice it once it's in place.
 Step 9: Put the top crust in place
For a full crust, lay it in position (carefully if you're going for the sliced look) and push it down around the edges of the bottom crust, remove the excess, and use your skewer or knitting needle to "crimp" the edge, just like you would use a fork to crimp a real pie crust.
If you're doing a lattice top like I am, follow these directions:
a) Lay five parallel strips, leaving the same width between strips, across the top as shown. Place the longest strip down the middle, the next 2 on either side of it, and the 2 shortest toward the edges. (I'm going to refer to the strips by number, with "1" at the top.)
 b) Gently fold strips 1, 3, and 5 back on themselves, leaving 2 and 4 in place.
 c) Lay a new strip (the other longest one) down the center of the pie over strips 2 and 4. Then fold numbers 1, 3, and 5 back down. You've finished the first weaving!

e) Lay the next longest strip parallel to the one you just place and fold strips 2 and 4 back in place. I have no idea why this is underlining.
 f) Go the other side of the center strip and again fold 2 and 4 back on themselves, but in the opposite direction. Lay another strip down and fold 2 and 4 back. It should like the picture above.
 Repeat with the last 2 small strips, but folding 1, 3, and 5 back in opposite directions and replacing them (should look like the photo below).
 STEP 10: Trim the excess
Just make sure the top crust is adhering well to the bottom one and/or the pan.
If you're making the other style top, also remove the excess, and then use your skewer or knitting needle to "crimp" the edge, just like you would use a fork to crimp a real pie crust

Gather some pastel dust or, as in this case, real cinnamon on your soft brush and lightly dust the top of your crust, thinking about how a real pie crust browns (usually more near the edges and a bit in the center). You can use your fingers to smooth out the dusting if you want. (I wish I'd gone a little heavier with the browning on this pie in hindsight.)
 STEP 12: Bake and enjoy!
Follow the clay manufacturer's instructions regarding temperature. Because of the small size and thinness of the clay, these will bake quickly - I give them 15 minutes. Allow to cool before using. And be sure to use the oven fan - probably not great to breathe polymer clay fumes on a regular basis.
 Optional Extra Steps
 You can dot a clay-strength glue on the top of the pie and attach a few strands of fiberfill as steam. (Use a toothpick to press them in place if you don't like glue-y fingers.)
If you've made a sliced pie, paint gloss medium or varnish over the apples at all the cut edges (don't forget the separate slice too). This will give it a realistic cooked appearance.
Bon Appetit! (Not really!)




 Posts
Posts